Pediatric specimens may be submitted in low-volume collection tubes or
may be collected by finger-stick. Infant specimens are best collected
using a heel-stick.
Main Line Health Laboratories (MLHL) provides the following standard
procedures for micro blood collection.
Finger-Stick Collection
Site Selection
Finger-sticks should be performed on the palmer surface of the distal
phalanx of the index, ring or middle finger. Middle or ring fingers are
most desirable, since the index finger has an increased number of nerve
endings and is therefore more sensitive. The sides and the tips of the
distal phalanx should not be used, as the tissue on this area of the
finger is only half as thick as that on the palmer surface. The fifth
finger is not used for skin puncture, as the tissue on this finger is
considerably thinner than that on other fingers. Finger-sticks should be
performed perpendicular to the fingerprints. If the puncture is made
parallel to the fingerprints, the blood will channel down the patient's
finger instead of forming a drop at the puncture site, making the
collection much more difficult.
Preparing the Finger
Choose a finger that is not cold, cyanotic (blue) or swollen.
Many times, the puncture site will require warming to facilitate
blood collection. The simplest method of warming the site is to
cover it for three minutes with a warm, moist towel or a
commercial skin-warming gel pack. Temperature must not exceed
40° C, the optimal warming temperature.
With your left thumb and index finger, grasp either the
patient's long or ring finger about three inches above the tip
of the finger.
With your right hand, hold the sides of the patient's finger.
Moving your left hand toward the tip of the patient's finger,
apply a massaging motion to the fleshy portion of the finger.
Repeat this massaging process five or six times.
Cleanse the puncture site using a 70 percent alcohol pad.
Allow the site to air-dry to provide disinfecting and to prevent
possible hemolysis by residual alcohol.
Performing the Puncture
Hold the finger with a moderately firm grip. Place your hand
against a support, if possible, to prevent movement.
Place the sterile lancet against the site, holding it between
your thumb and middle finger. Position the lancet to cut
transversely to the axis of the finger.
Depress the plunger using your index finger and hold for a split
second.
Release the plunger.
Remove the lancet.
Discard the lancet into a sharps container.
Collecting the Specimen
Wipe away the first drop of blood with a gauze pad as this drop
may contain an excess of tissue fluids, which could cause
erroneous test results.
Turn the patient's hand palm down.
Microtainer® (Bullet) collection:
Position the Microtainer (Bullet) directly
beneath the puncture site. Intermittent gentle
application and relaxation of pressure on the
entire finger allows the capillaries to refill
with blood and helps assure continuous blood
flow. Apply pressure at the ends of the puncture
slit, opening the puncture slightly. This will
maximize blood flow.
Since the puncture site needs to remain free of
residual blood, wipe it frequently with a gauze
pad. Milking or scraping the puncture site
should be avoided, since it can cause hemolysis
or contamination of the specimen.
During difficult or slow collections using EDTA
(Lavender) tubes, try to rotate the collector
after each of several drops. This will hasten
the contact of the blood with EDTA while
collecting.
Tubes should be filled quickly to a level
between the lines. Work quickly to minimize the
chance of microclots forming in the EDTA tube.
When each collection is complete, securely cap
and mix additive tubes thoroughly by inversion
at least 20 times. This is especially important
for EDTA tubes.
Send any partially filled tubes to the
laboratory to determine if they are suitable for
testing.
If it is necessary to collect more blood from an
additional puncture, begin again by warming the
site, cleansing, drying, resticking with a new
lancet and collecting into an unused tube.
Completing the Procedure
Wipe the site dry and apply direct pressure with a gauze pad
until the bleeding has stopped.
Dispose of all used materials in an appropriate biohazard
container.
Label the tubes with complete patient name as it appears on the
test requisition form, the date and time of specimen collection
and collectors tech code or initials, and transport them to the
lab for processing. Samples collected in EDTA for hematology
must be tested within four hours of collection.
Heel-Stick Collection
Collection of blood specimens by heel-stick is used in infants and very
young children when venipuncture is not the method of choice. Blood
obtained by skin puncture consists of a mixture of blood from
arterioles, venules and capillaries. Blood collected by skin puncture is
also affected by interstitial and intracellular fluid. It is important
to note the method of collection (i.e., heel-stick) on the request slip.
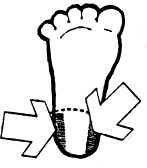
Site Selection
The
recommended site of a heel-stick is on the plantar surface, either
medial to a line drawn posteriorly from the great toe to the heel, or
lateral to a line drawn posteriorly from between the fourth and fifth
toes to the heel. Do not puncture at the posterior curvature. Be sure
the site is not edematous so tissue fluid will not contaminate the
specimens.
Note: Do not puncture through a previous site because
of the danger of infection.
Preparing the Heel
Many times, the puncture site will require warming to facilitate
blood collection. The simplest method of warming the site is to
cover it for three minutes with a warm, moist towel or
commercial warming device.
Prep the skin by cleansing with a 70 percent alcohol prep and
allow to dry.
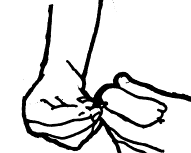
Performing the Puncture
Immobilize
the foot by placing your fingers around the arch, behind the
heel and well below the puncture site, as illustrated.
When using a Microtainer or Tenderfoot® lancet, place the lancet
perpendicular to the heel print.
Hold the lancet on site with moderate pressure.
Depress the plunger with the index finger to make a puncture.
Immediately release the plunger while holding the lancet on
site.
Remove the lancet.
Discard the lancet in a sharps container.
Wipe away the first drop of blood with a gauze pad, as this drop
may contain an excess of tissue fluid, which can cause erroneous
test results.
Collecting the Specimen
Collect the blood, using a Microtainer® or capillary tube.
Moderate pressure, without squeezing, may be required near the
puncture site to assure an adequate flow of blood.
When performing a heel-stick, apply pressure only to the foot.
Do not "milk" the infant's leg. Since the puncture site needs to
remain free of residual blood, wipe it frequently with a gauze
pad. Milking or scraping the puncture site should be avoided
since it can cause hemolysis or contamination of the specimen.
During difficult or slow collections using EDTA (Lavender)
tubes, try to rotate the collector after each several drops.
This will hasten the contact of the blood with EDTA while
collecting.
Tubes should be filled quickly to a level between the lines.
Work quickly to minimize the chance of micro-clots forming in
the tube.
When each collection is complete, securely cap and mix additive
tubes thoroughly by inversion at least 20 times. This is
especially important for EDTA tubes.
Order of collection: EDTA tubes, other additive tubes (Green or
Gel), Red top tubes.
Completing the Procedure
Following collection of blood sample, press a sterile sponge to
the puncture site until bleeding stops. Elevating the foot above
the level of the heart will help stop bleeding.
Apply a "Spot Band-Aid" to the site once the bleeding has
stopped.
Dispose of all used materials in an appropriate biohazard
container.
Label the tubes with complete patient name as it appears on the
test requisition form, the date and time of specimen collection
and the collector's tech code or initials, and transport them to
the lab for processing.
References:
Becton Dickinson. "Microcollection: A Quick Reference Guide." 1991.
College of American Pathologists. "So You're Going to Collect a Blood
Specimen." 1982.
Susan Phelan. "Phlebotomy Techniques: A Laboratory Workbook." ASCP
Press, 1993.
Note: Coagulation testing and certain esoteric testing
cannot be collected by micro-collection techniques. Refer to the
submission requirements in the Directory of Services.